If you’re looking for a relatively simple way to automate routine tasks that involve extracting information from images, using computer vision libraries like OpenCV might be a great tool to accomplish your goals.
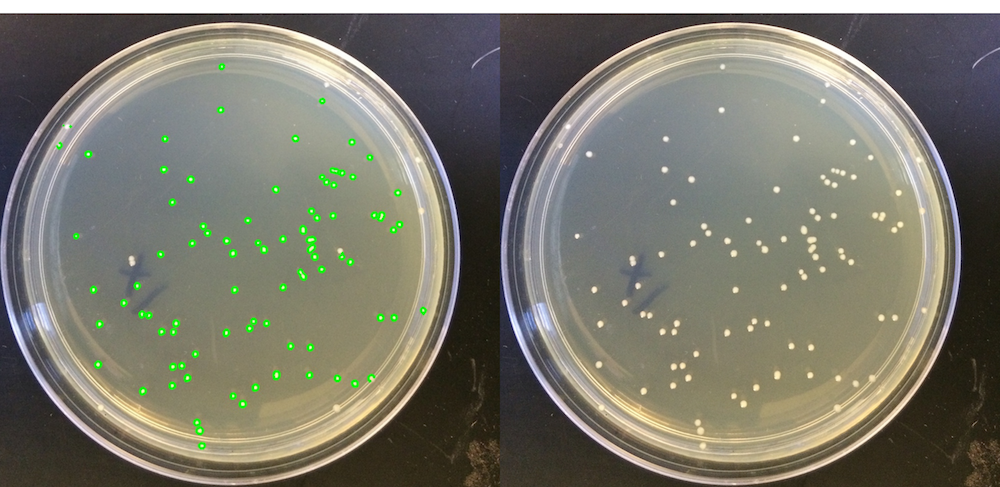
As an example, we’ll take a look at a routine task that most scientists do that isn’t a good use of their time – counting colonies in a petri dish.
The reason we will be using nodejs is because of the accessibility of javascript to most developers. Although OpenCV is mostly written in c++ (with python bindings for the web developers), javascript is still more familiar to most and it’s easier to get a server running with nodejs than it is with a platform like django. Note however that you may be limited to a fraction of the full power of OpenCV with nodejs since the bindings of the module we will be using is not complete and the documentation is less thorough than the documentation for c++ or python.
You can take a look at the application to convert an image of a petri dish and count the colonies inside and the source code.
First you need to install OpenCV on your computer or server. You can find instructions doing a quick search on google and we won’t cover that on this tutorial.
Once you have OpenCV installed, you’ll need to install node.js if you don’t already have it installed on your system. Then you need to add the node-opencv module to your machine by running npm install opencv in your project directory.
Next, we’ll create a simple server to load an image of your petri dish and display it on your browser with the colonies highlighted and the number of detected colonies.
create a file called app.js and add the following:
const http = require('http');

const server =  http.createServer( (req, res) => {
  res.writeHead(200, {'Content-Type': 'text/plain'});
  res.end('okay');
});

server.listen(8080, function() {

});
Now if you head over to http://localhost:8080, you should be able to see the text “hello world!”.
Next we’re going to use OpenCV. Include the module we installed earlier, read the image, then run it through some filters, and save and write the image.
function countColonies(res) {
	cv.readImage('./private/imgs/7.jpg', function(err, im) {
	  if (err) reject(err);

	  im = im.copy();

	  // store the dimensions in variables for later processing
	  var width = im.width();
	  var height = im.height();

	  if (width < 1 || height < 1) throw new Error('Image has no size');

		// set the width of the image to 1000 pixels
		nw = 1000;

		// maintain pixel ratio of image
		nh = (height / width) * nw;

		// resize image to create standard variables for sizes of
		// colonies to detect later
		im.resize(nw,nh);

		// copy resized image and store it in a variableto later draw
		// circles around colonies for visualization
		var copied = im.copy();

		// apply gaussian blur
		im.gaussianBlur([11,11]);

		// apply canny filter
		im.canny(50, 125);

		var contours = im.findContours();

		var colonyCount = 0;

		// only draw and count found contours within range of deinfed length
		for(i = 0; i < contours.size(); i++) {
	    if(contours.arcLength(i, true) < 100) {
				// draw contours for each found contour and color green
				copied.drawContour(contours, i, [0, 255, 0], 3);
				colonyCount += 1;
			}
		}

		copied.save('./copy.png');

		res.write('<div>'
			+ '<h1>'+colonyCount+'</h1>'
			+ '<img src="./copy.png" width="500"/>'
			+ '</div>'
		);

	});
}
By resizing our image we create consistency with the values that we add to the various filters. By modifying our image to grayscale and blurring it, we get a better result with our canny filter to detect the edges of our colonies. Lastly, by defining the arc length of the found contours, we can eliminate items detected that are outside the bounds of the criteria that we set.
Some things to note are that many of the filters permanently alter the images, so it is good practice to copy the images before processing. Also rgb data is read backwards in OpenCV so depending on what colors you want to use to highlight, just turn the values around.
Now we’ll need to add some default modules to process requests to paths to our image and the ability to read our image:
const fs = require('fs');
const url = require('url');

// modify our server to process requests to our image
// and return the function we created earlier for all other requests
const server =  http.createServer( (req, res) => {
	var request = url.parse(req.url, true);
	var action = request.pathname;

	if (action == '/copy.png') {
		var img = fs.readFileSync('./copy.png');
		res.writeHead(200, {'Content-Type': 'image/png' });
		res.end(img, 'binary');
	} else {
	  res.writeHead(200, {'Content-Type': 'text/html'});
	  countColonies(res);
		res.end();
	}
});
Finally run node app.js and you should be able to view the processed image with highlighted colonies and the count in http://localhost:8080.
You will eventually want to extract the filter values to some sort of user based input so that you can have more granular control over the results. Also, you can use html5 elements to access the camera in your phone so you have a working app and have the results stored for further processing.
You may even want to create functions to highlight missed colonies or remove miscounted colonies which can then later be used to create a model for your machine learning algorithm to get better results in the future.
There you have it. You made a web based colony counter in less than 50 lines of code. You can find the colony counting gist here.